You do not need to be a developer to build your own AI tool, and you do not need to be one to make a useful one. A small tool that rewrites your emails, sorts your leads or answers questions from your own documents can be ready in an afternoon, and most of the work is thinking, not coding. This guide shows how to build your own AI tools with no code, with an automation platform and with an API, and it explains when each way makes sense.
We also cover the parts that other guides tend to skip: how to write the instructions, how to test the result, how much it costs to run and what to watch for with private data. If you are wondering how to build your own AI tools without wasting weeks on the wrong approach, start with the quick answer below.
Quick Answer: Which Way to Build Your Own AI Tool Fits You
There are four common ways to build an AI tool, and they differ mostly in skill, time and control. Pick the first one that does the job, because every step down the list costs more time.
| Path | Skill needed | Time to a first version | Best for |
|---|---|---|---|
| Custom assistant in a chat app | None | An hour or less | Personal helpers, writing and research tasks |
| Automation or agent platform | Low, no code | A few hours | Tasks that connect several apps |
| API plus a simple app | Basic coding | A day or more | A tool for customers or a public page |
| Fine-tuning or training a model | High | Days or weeks | Special data or strict privacy needs |
Why Build Your Own AI Tools Instead of Using Ready-Made Ones?
Ready-made tools are built for the average user, and your work is rarely average. When you build your own AI tools, you decide what the tool knows, how it answers and where your data goes. That control is the main reason people start.
Benefits of building your own
- It fits your exact task. The tool follows your format, your tone and your rules.
- You control the data. You choose what the model sees and what stays private.
- It can cost less over time. One small tool can replace several subscriptions for a narrow job.
- You learn how AI behaves. Building a tool makes you better at using every other one.
Limits to expect
A tool you build is a tool you maintain. Models change, platforms change their plans and your prompt needs regular checks. You also carry the responsibility for wrong answers and for the data you handle, so keep the first tool small.
Who should build their own AI tool
Freelancers, small business owners, marketers, support teams and developers all gain from it, as long as they have one repeated task and a clear idea of a good result. If you have no repeated task yet, use a ready-made tool for a few weeks first and note where it falls short.
What Counts as an AI Tool When You Build Your Own?
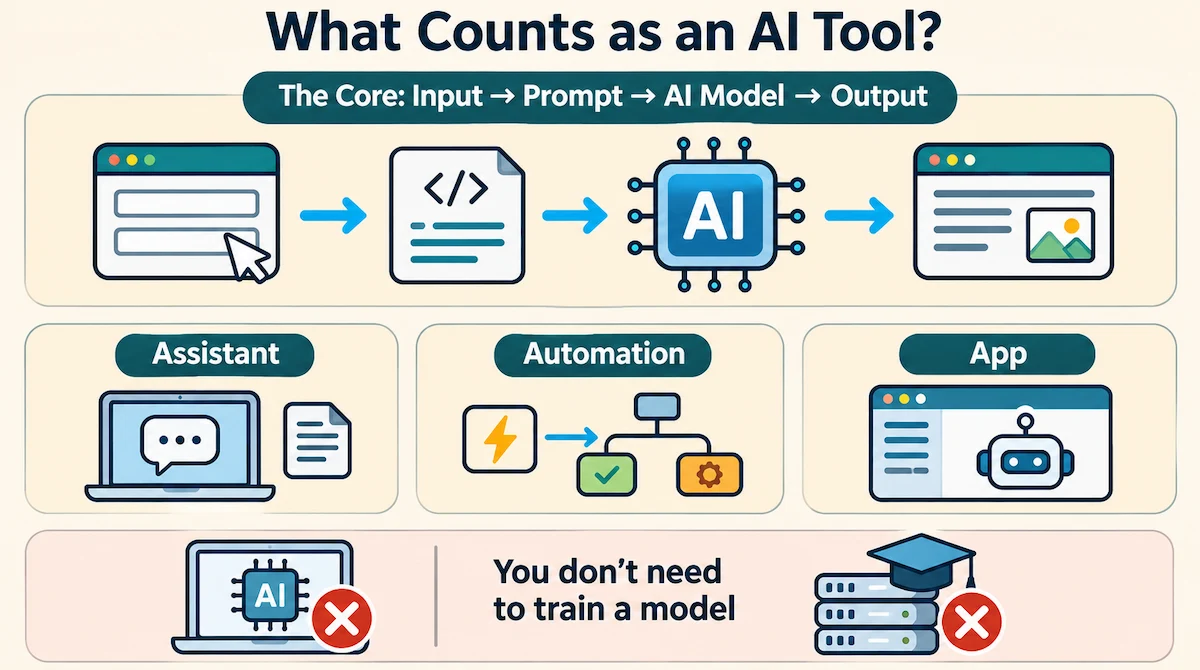
The phrase sounds big, but most AI tools are simple. We use the word for any small program that takes an input, sends it to an AI model with clear instructions and returns a useful result.
A prompt, inputs and an output
The smallest AI tool is a prompt template with a few input fields. You type a product name and a few features, the tool wraps them in fixed instructions, the model answers and you get a finished product description. Everything else, such as a nice page, a login or a connection to your apps, is added on top of that core.
Assistants, automations and apps
An assistant is a chat with fixed instructions and some files. An automation runs by itself when something happens, for example a new form entry. An app wraps the same idea in a page that other people can open. All three are AI tools, and you can start with one and grow into the next.
What you do not need to build
You do not need to build a model. Training a model like the ones behind the big chat apps takes huge amounts of data and money, and it is almost never the right step for a business tool. You use an existing model and spend your effort on the instructions, the data you give it and the way people use the result. If a term here is new, the AI terms glossary explains it in plain language.
How AI Tools Work: The Basics You Need
You can build a good tool with a short list of ideas. We suggest learning these three before you open any platform.
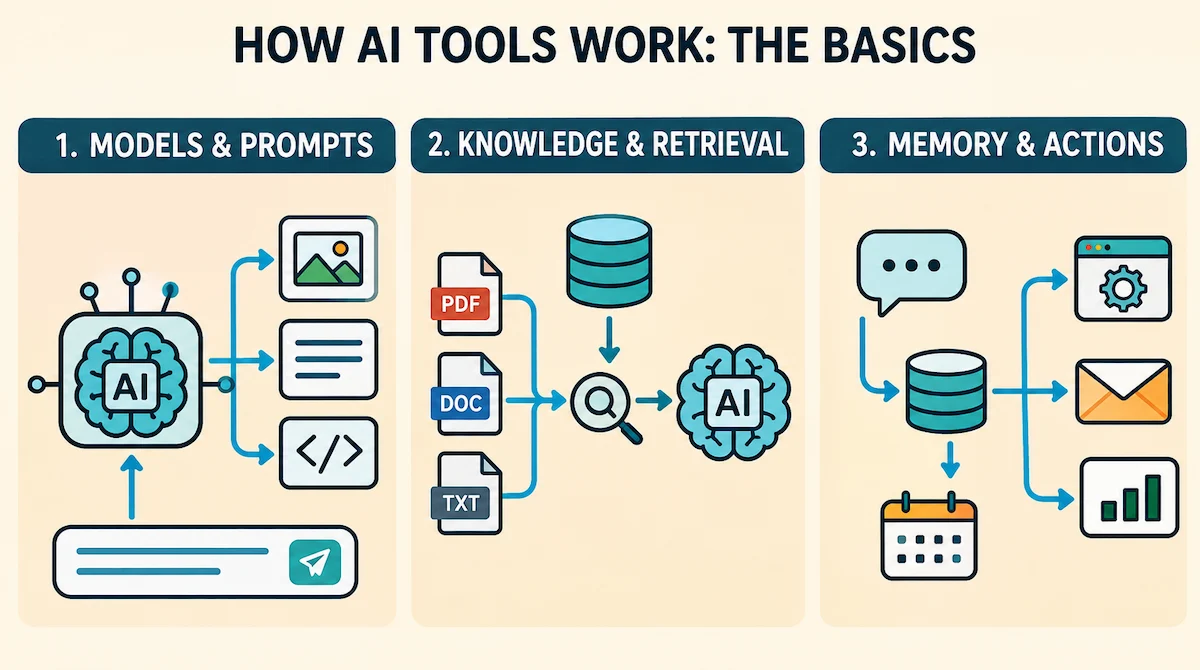
Models and prompts
The model is the engine and the prompt is the instruction. The same model gives very different results depending on what you tell it, how much context you add and what format you ask for. Most of the quality of a tool comes from the prompt and not from the model.
Knowledge files and retrieval
If your tool has to answer from your own material, such as a price list or a policy document, you give it the files. Behind the scenes, many platforms use retrieval: the tool finds the matching part of your files and hands it to the model together with the question. This is often called RAG, and it works well for questions about documents that change.
Memory and actions
A basic tool forgets everything after the answer. If you want it to remember preferences, you save them in a small file or a note and load them each time. If you want it to do things, such as send a message or add a row to a sheet, you connect an action. Keep the first version to as few actions as possible.
Skills and Tools You Need Before You Start
The skills depend on the path. For a no-code assistant you need clear writing and patience to test. For an automation platform you need to understand triggers and fields, which you learn quickly. For the API route you need basic coding, usually Python or JavaScript, plus an understanding of how web requests work.
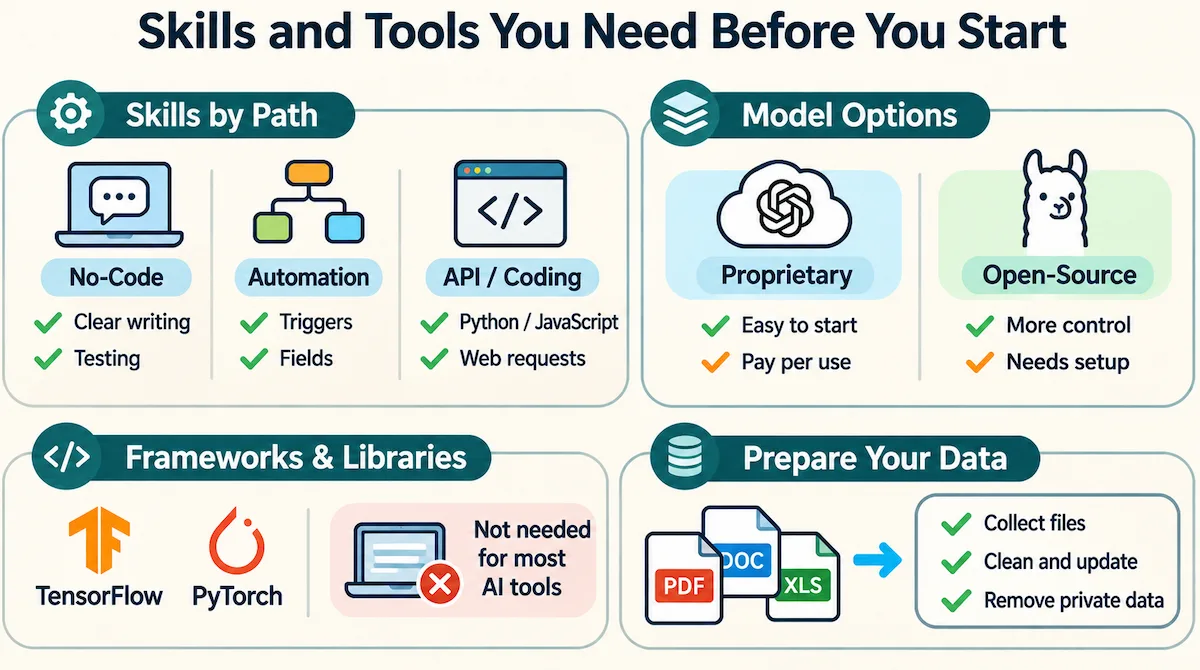
Open-source vs proprietary models
Proprietary models are used through an online service and are easy to start with, but you pay per use and your data goes to the provider. Open models can run on your own computer or server and give you more control, but they need setup and a stronger machine. For a first tool, most beginners are better off with a proprietary model and a strict spending limit.
Frameworks and libraries
If you ever train or fine-tune a model, you will meet libraries such as TensorFlow and PyTorch. You do not need them to build your own AI tools with prompts, files and APIs, so skip them until you have a case that really needs training.
Prepare your data
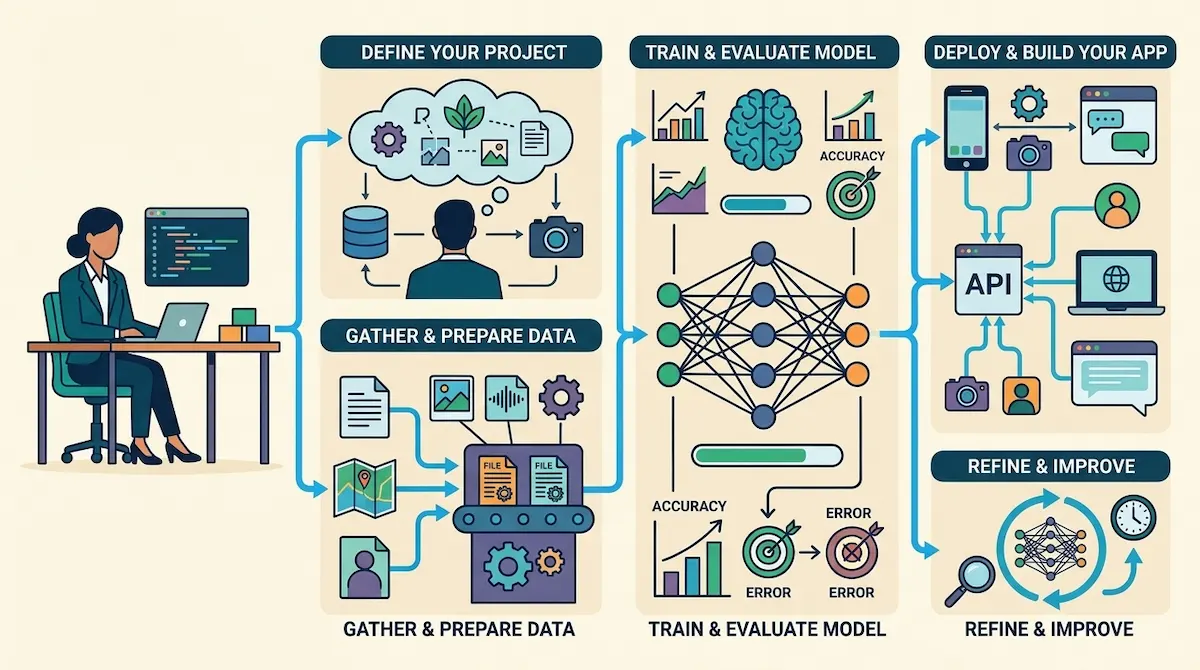
Whatever path you choose, the quality of your files decides the quality of the tool. Collect the documents the tool should use, delete duplicates and outdated versions, fix obvious errors and remove private details. If you plan to fine-tune later, collect real examples of good inputs and outputs and label them consistently.
Step 1: Pick One Problem and Define a Good Result
Most first attempts to build your own AI tools fail for one reason: the job was too wide. “Help with marketing” is not a job. “Turn a list of product features into a 60 word description” is.
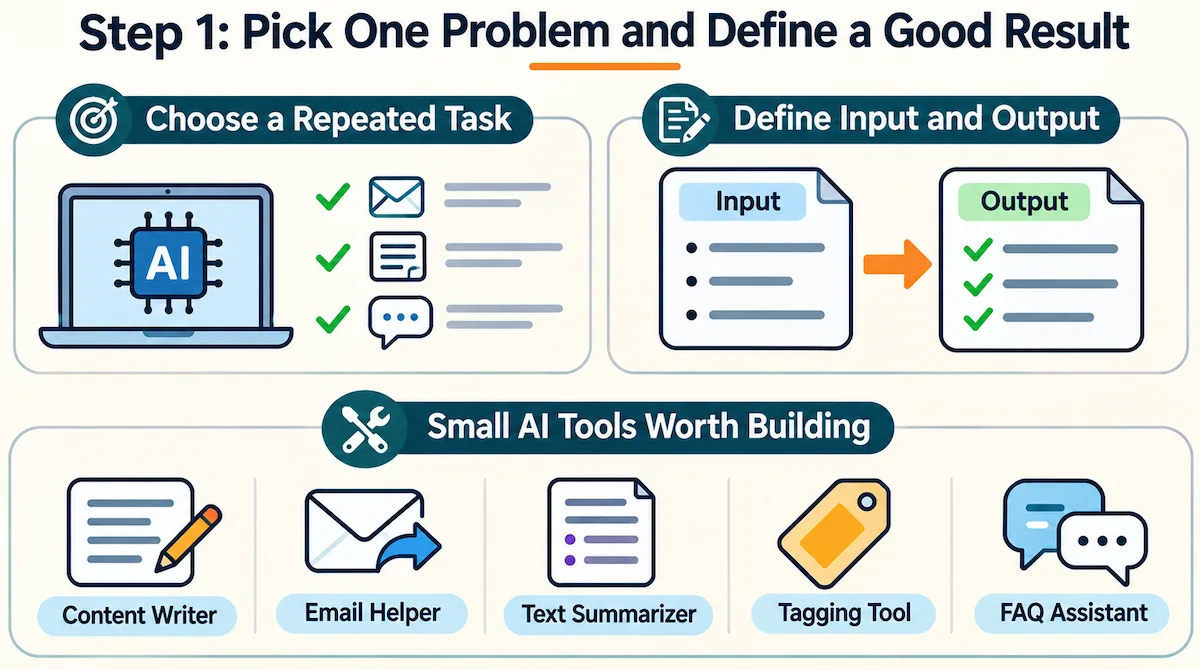
Choose a task you repeat
Look for something you do at least weekly, that follows a pattern and that takes more than a few minutes. Replying to similar emails, summarizing calls, tagging requests and drafting short texts all fit. A task you do once a year is not worth building a tool for.
Write the input and the output
Write down exactly what goes in and what should come out. Put an example of each on one page. If you cannot write a good example of the output by hand, the tool will not produce one either, and the instructions need more thought first.
Small AI tools worth building
- A product description writer that follows your brand style
- A contract or report summarizer with a fixed list of questions
- An email reply helper for the five most common customer requests
- A question and answer helper trained on your own help pages
- A lead sorter that reads a form entry and adds a label
- A meeting note cleaner that returns tasks, owners and dates
Step 2: Choose Your Path: No Code, Low Code or Code
Once the job is clear, the way to build your own tool usually follows. Here is how we think about the four options.
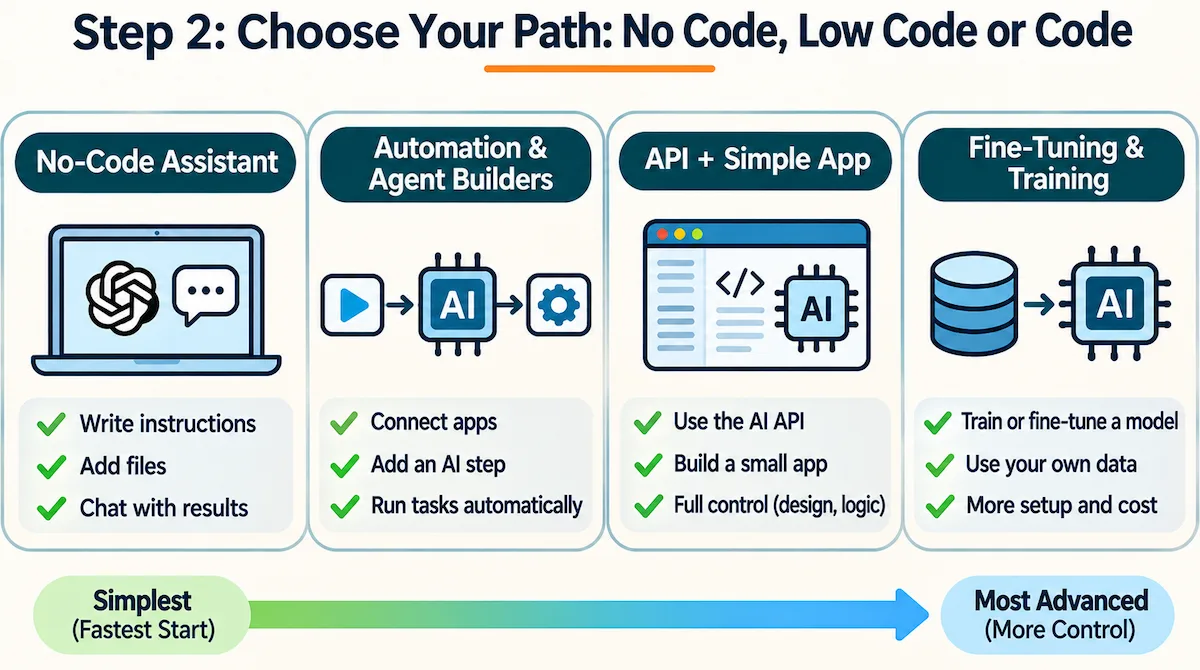
No-code assistants
You write instructions, add files and chat with the result. This is the fastest start, and it is enough for many personal and small team tasks.
Automation and agent builders
You connect an app to an AI step and to an action, with boxes and lines and no code. This suits jobs that run on their own, such as handling every new form entry.
API plus a simple app
You call the model through its programming interface and build a small page around it. You get full control over the look and the logic, and you also take on hosting, security and cost.
Fine-tuning and training
You change a model with your own examples. This is the heaviest option, and we cover it near the end of the guide because most people never need it.
No code vs code: how to choose
| Question | No code | Code |
|---|---|---|
| How fast is the first version? | Hours | Days |
| How much control do you have? | Limited to what the platform allows | Full |
| Who maintains it? | The platform | You or your developer |
| What does it cost? | A subscription | Usage fees plus your time |
| Can customers use it? | Often only with limits | Yes, on your own page |
How to Build Your Own AI Tool Without Coding
This is the easiest way to build your own AI tool, and it is where we suggest every beginner starts. A note on the tools: this part of the market changes fast. OpenAI has announced plans to retire custom GPTs and move the features to plugins, and Google is moving Gemini Gems to a feature called skills. Other chat apps offer projects with instructions and files. Check which of these your account can still create before you plan around one.
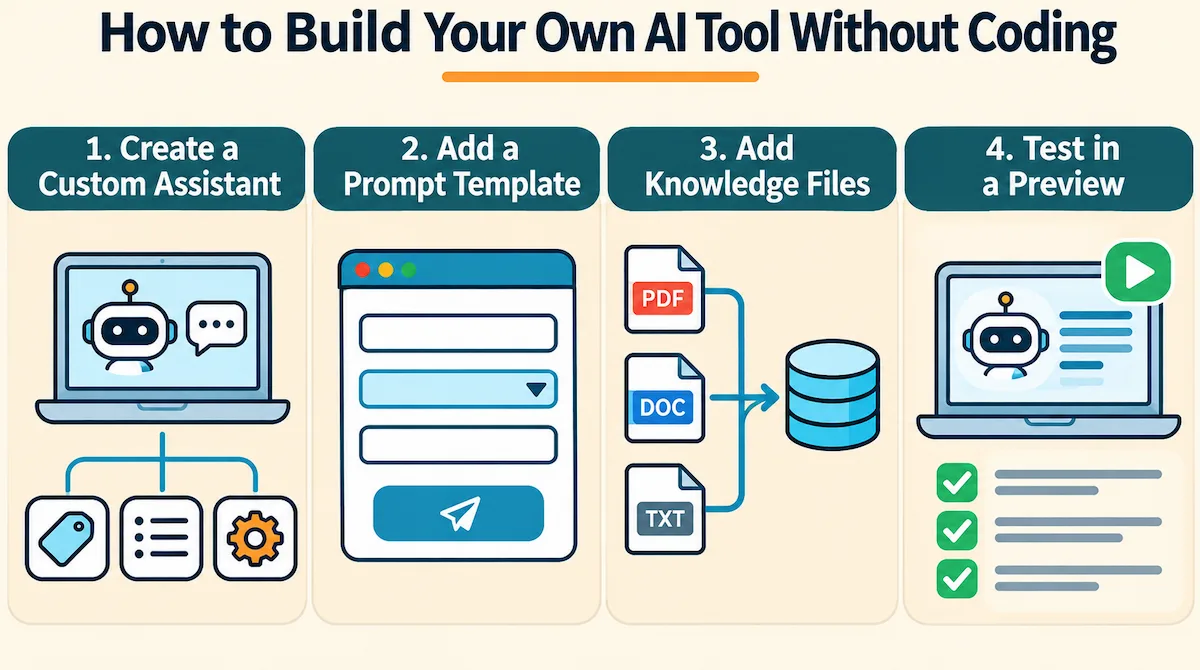
A custom assistant in a chat app
Open the part of your chat app where you can create a custom assistant, a project or a skill. Give it a name and describe its job in two or three sentences. Then add the rules: what it should always do, what it should never do and what the answer should look like.
A prompt template with input fields
Turn your instructions into a template. Mark the parts that change, such as the product name or the customer message, as fields and fill them in each time. Some AI tool builders even let you create these fields in a form, so a coworker can use the tool without seeing the prompt. If you want a ready example of a no-code build, the guide on how to build a chatbot without coding walks through the steps.
Add knowledge files
Upload the documents your tool should use: a price list, a style guide or a set of old answers. Keep them short, current and well organized, because the tool can only be as good as what it reads. Remove anything outdated or private before you upload.
Test in a preview
Most platforms have a preview where you can try the tool before anyone else sees it. Use five real examples from your own work, and compare the output with what you would have written yourself. We cover this in more detail in the testing step below.
Example: Build an AI Support Assistant Step by Step
A concrete case makes the steps easier to follow. Imagine a small online shop that gets the same twenty questions about shipping, returns and sizes.
First, collect the shipping policy, the return policy and the size chart in three short documents. Second, write a prompt that says the assistant answers only from those documents, uses a friendly tone and replies in under 80 words. Third, add the rule that if the answer is not in the documents, it says so and asks the customer to contact a person. Fourth, test it with twenty real past questions and mark each answer as correct, partly correct or wrong. Fifth, fix the documents or the prompt until almost all answers are correct, and only then place it on your site or in your chat channel.
How to Build an AI Tool With an Automation Platform
An automation platform is the next step when your tool should run without you. You build a chain of steps with a visual editor, and one of the steps calls an AI model.
Trigger, AI step, action
Every workflow has the same three parts. A trigger starts it, such as a new email or a form entry. An AI step reads the input and produces a result, such as a label, a summary or a draft reply. An action does something with the result, for example saves it in a sheet or sends it to a chat channel.
Platforms to look at
Popular options include n8n, Zapier, Make and Flowise. They differ in price, hosting and how much code they allow, so test the free plan of two of them with the same small job before you choose. We do not list prices here, because plans change often and you should read them on the official pages.
Example workflow
A simple workflow for a small shop looks like this. A customer fills in a contact form. The platform sends the message to the AI step with the instruction to label it as an order question, a complaint or a general question and to write a short draft reply. The label and the draft are saved in a spreadsheet, and a person checks the draft before it goes out. If you want to go further, the guide on how to create an AI automation workflow covers more patterns.
AI tool or AI agent?
A tool does one defined job each time you call it. An agent has a goal and decides its own steps, such as searching, reading a result and trying again. Agents are powerful but harder to control and more expensive to run, so build a simple tool first and add agent behavior only when a fixed workflow cannot do the job.
Connect sheets and chat apps
Spreadsheets are the easiest place to keep results, because anyone can open them. Chat apps such as Slack or Telegram are a good place for alerts and quick answers. Start with one connection and add more only when the first one works every time.
How to Build an AI Tool With an API
If you can write a little code, or you have a developer to help, using the API to build your own tool gives you the most control. You send the model a request and your own page shows the answer.
Get an API key
Create an account with the model provider and generate an API key. This key works like a password and is tied to your billing, so treat it carefully. Set a monthly spending limit in the account before you write any code.
Write the system prompt
The system prompt is the fixed instruction that goes with every request. Describe the job, the tone and the output format, and add one or two examples. Keep it short and specific, and keep a copy in a file so you can compare versions. The next section covers writing it in more detail.
Add a simple interface
A basic tool needs a text box, a button and a place for the answer. You can build that with a small web page and a short server script, or with a no-code page builder that calls your API. Do not start with accounts, payments or history. A tool that does one thing well is easier to check and to fix.
Keep your API key safe
Never put the key in the code that runs in the browser, because anyone can read it there. Call the model from a small server, and store the key in an environment variable. Rotate the key if you ever paste it in a place where others can see it.
Connect the tool to your existing software
A tool is most useful when it sits inside the place where you already work. Many apps accept requests from other services, so your tool can receive data from a form, a help desk or a spreadsheet and send its result back. Keep the connection simple, log every request and test it with fake data before you use real customer information.
Deploy and host
When the tool works on your computer, put it on a hosting service that can run a small server. Add a limit on how many requests one visitor can make per day, so a single user or a bot cannot run up your bill.
Can You Fine-Tune or Train Your Own Model?
Yes, but it is the last option and not the first. Most business tools work better with a clear prompt and good files than with a changed model.
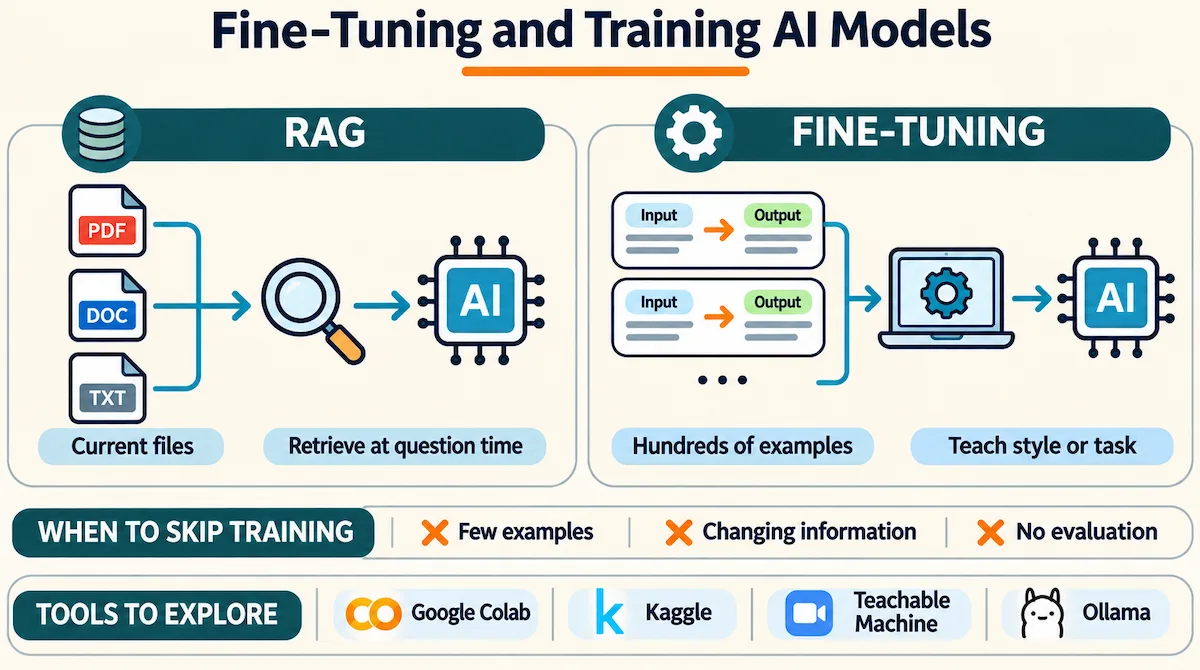
Fine-tuning vs RAG
Fine-tuning teaches a model a style or a task using hundreds or thousands of your own examples. RAG gives the model your documents at the moment of the question. If your goal is accurate answers from changing information, RAG is usually the better and cheaper choice. Fine-tuning fits cases where you need a very specific style or format that prompts cannot reach.
Free tools and their limits
Learners often use free cloud notebooks such as Google Colab and Kaggle for small experiments, but both limit how long you can run and how much compute you get. If you want to try a simple model with no code at all, Teachable Machine lets you train an image, sound or pose classifier from examples in your browser.
Running a model on your own computer
Open models can run on your own machine with tools such as Ollama. This keeps your data on your computer, which helps with privacy, but it needs a reasonably strong machine, and the smaller models are weaker than the large online ones.
When to skip it
Skip training if you have fewer than a few hundred good examples, if your information changes often or if nobody on your team can evaluate the result. Also check the license of any open model before you use it in a product, because the terms differ between models.
Step 3: Write a Prompt That Does the Job
The prompt is where most of your time should go. A good prompt is clear about the role, the task, the format and the limits. For a deeper look at how these instructions work, see the guide on system prompts explained.
- Say who the tool is and who it writes for. For example, a support assistant for a small online shop that writes for customers.
- Describe the task in one sentence. Then list the steps if the order matters.
- Define the format. Ask for a heading, three bullet points or a table with named columns.
- Add one or two examples. A good example does more than a long explanation.
- List what it must not do. No invented prices, no promises about delivery and no medical or legal advice, for instance.
- Tell it what to do when it does not know. A sentence like “If the answer is not in the files, say so” prevents many made-up answers.
Step 4: Test, Break and Improve Your AI Tool
A tool that works on your best example may fail on a normal one. Before anyone else uses it, we suggest a short round of testing.
Take ten real inputs from your own work. Include a few easy ones, a few messy ones and a few that should be refused. Run all of them, and compare each answer with what you would accept. Note every wrong or odd answer and decide whether the fix belongs in the prompt, in the files or in a limit on what the tool is allowed to do.
How to measure whether your tool works
Pick two or three simple measures before you launch. Accuracy is the share of answers you would accept without changes. Time saved is the minutes per task before and after. Error rate is how often a person has to correct the result. Write the numbers down after each round of testing, so you can see if a change in the prompt really helped.
Then try to break it. Paste in an empty message, a very long one, a message in another language and a message that asks for something the tool should not do. Fix what fails, and run the full set again. When the results are good three rounds in a row, you can share the tool with one or two real users.
Step 5: Launch, Monitor and Maintain
Launching is the start of the work. Share the tool with a small group first, and ask them to send you every answer that looks wrong. Keep a simple log of questions and answers, with names and private details removed, so you can see patterns.
Plan a short review every month. Models, platforms and prices change, and a prompt that worked in spring can behave differently in autumn. The guide on how to keep up with AI tools helps you follow those changes without spending hours a week on it.
When you build your own AI tools, keep a short change log: the date, what you changed in the prompt or the files and why. If a good tool suddenly gets worse, the log shows you which change caused it, and it saves a lot of guessing. Keep the log next to the prompt, so both are always updated together, and ask each user to report any answer that looks wrong so you can add it to your test set.
Safety, Privacy and Cost Control
A tool that works is not yet a tool that is safe. Four areas need attention before you let others use it, and they matter even more when you build your own AI tools for customers instead of for yourself.
Sensitive data
Think about what you send to the model. Customer names, health details, contracts and financial data should not go to a service you have not checked. Read the provider terms on data use, remove private details where you can and decide which tasks must stay offline. Our guide on AI data privacy for business covers what to look for.
API keys and access
Keep keys out of the browser, out of shared documents and out of screenshots. Give each tool its own key, so you can switch one off without breaking the others.
Wrong answers and bias
Models sometimes state wrong things with confidence, and they can repeat bias from their training data. For any tool that affects people, such as hiring, pricing or health, keep a person in the loop and review the output.
Spending limits
Set a monthly limit in the provider account and an alert at half of it. Limit the length of the answers and the number of requests per user. A loop that calls the model too often is the most common cause of a surprise bill.
How Much Does It Cost to Build an AI Tool?
The honest answer is that it depends on the path, and the numbers below are about the type of cost and not about exact prices. Check the current plans before you commit, because they change often.
| Path | What you pay for | Cost level |
|---|---|---|
| Custom assistant in a chat app | A subscription for the chat app, if the feature needs one | Low |
| Automation platform | A platform plan plus the AI step usage | Low to medium |
| API plus a simple app | Pay per request, hosting and your time | Low to medium, grows with use |
| Fine-tuning | Compute, data work and often a developer | Medium to high |
In terms of time, a no-code assistant can be ready in an hour, and a first working API tool in a weekend if you are comfortable with code. If you want to compare the cost of building with the cost of ready-made options, our guide on how much AI tools cost gives a useful baseline.
Common Mistakes When You Build Your Own AI Tools
- The job is too wide. One tool should do one task.
- Too many connections at once. Add apps and actions one at a time.
- No real examples in the prompt. A single good example improves the output more than extra rules.
- No testing with messy input. Real users write in unexpected ways.
- No cost limit. A missing limit is how a small test turns into a large bill.
- Private data in the wrong place. Check what you upload before you upload it.
Build vs Buy: When a Ready-Made AI Tool Is Better
Building makes sense when your task is specific, you repeat it often and no existing tool does it well. Buying makes sense when many companies already solve the same problem, such as meeting notes, transcription or image editing. A ready-made tool comes with support, updates and a team that fixes problems, and that is worth real money.
There is also a middle way. Many teams buy a ready-made tool for the common tasks and build their own AI tools only for the few steps that make their work different, such as a custom reply style or a check against their own price list. That keeps the maintenance small and the value high.
We suggest a simple rule: if a good tool already exists and costs less than your time to build and maintain a copy, buy it. If you are comparing options, the guide on how to choose AI tools for business gives a clear way to decide.
What to Do With Your AI Tool
Once a tool works, you have several options. You can keep it for your own use, share it with your team, use it as a free tool that brings visitors to your site or build it into a service for clients. Some people sell access to a tool that solves a narrow problem well.
Whichever route you take, write a one page description of the tool: what it does, who uses it, which files it reads and who fixes it when something breaks. A tool with an owner and a description is still useful a year later, while a tool nobody remembers building tends to be forgotten or switched off.
If your goal is to save time inside a business, the guide on how to automate business tasks with AI shows where small tools tend to pay off first.
Promote or sell your AI tool
If the tool solves a narrow problem for other people, you can offer it as a free tool that brings visitors, as a paid subscription or as part of a service you sell. Start by showing it to ten people who have the problem and watch how they use it. Their questions will tell you what to fix before you spend anything on promotion.
How to Build Your Own AI Tools FAQ
Can I build my own AI tool without coding?
Yes. You can build a custom assistant or a prompt template in a chat app, or connect an AI step to your apps in an automation platform, with no code at all.
How much does it cost to build an AI tool?
It ranges from a free or low subscription for a simple assistant to usage fees and hosting for an API tool. Fine-tuning costs the most, so check current plans first.
How long does it take to build an AI tool?
A simple assistant can be ready in about an hour. An automation takes a few hours, and a first API tool usually takes a day or a weekend if you know some code.
Do I need to train my own AI model?
No. Most tools work well with an existing model, a clear prompt and your own files. Training only makes sense for special data, a very specific style or strict privacy needs.
Can I build an AI tool for free?
Yes, to start. Free plans on chat apps and automation platforms are enough for a test, but they have limits on usage and features, so a tool for daily work usually needs a paid plan.