You need five posts by Friday, no designer is free, and the brand folder is a mess. This is the situation where learning how to create social media graphics with AI pays off fastest. A short text prompt gives you a first draft of a post, a quote card or a carousel slide in seconds, and a design editor lets you finish it in your brand colors.
The tool is only half of the job. Good social media graphics still need a clear message, the right size for each platform, readable text and a look that matches the rest of your feed. This guide covers the process step by step, prompts you can copy, a fix for garbled text in AI images, image sizes by platform, the tools worth trying, brand consistency, common mistakes and the rules for commercial use and labeling.
What does it mean to create social media graphics with AI?
To create social media graphics with AI means describing the image you want in plain words and letting an AI image generator or an AI design tool produce the visuals, the layout or both. You then edit the result, add your own text and logo, and export it in the size the platform needs. The AI writes the first draft and you make the decisions: the message, the brand look and the final wording.
AI design is not the same as using a template. A template gives you a fixed layout that you fill with your own content, while an AI tool builds a new image or layout from your description. Many platforms now combine both, so you can start from a prompt and finish inside a template. For the wider picture of text, image and video tools, read the guide to AI content creation.
Benefits of creating social media graphics with AI
The main reason to create social media graphics with AI is that it removes the slowest parts of the job: starting from a blank canvas, searching for images and rebuilding the same layout in five sizes. The gain is real when a person still controls the message and the final look.
- Speed. A first draft takes seconds, so you can spend your time on the message and the edit instead of the setup.
- Lower cost per graphic. Many tools charge a flat monthly fee instead of a fee for each design, which suits teams that post often.
- No design skills needed. You describe the result in words, and the tool handles the layout.
- Consistency. A saved brand kit and a master prompt keep colors, fonts and style the same across posts.
- More versions to test. You can generate several options for the same idea and see which one your audience prefers.
- Easy resizing. One design can be adapted to every platform without starting over.
What you need before you start
A few minutes of preparation save a lot of rework. Without them, the tool gives you a nice picture that does not fit your brand, your platform or your message.
Know your brand basics
Collect the essentials in one place: your logo, brand colors with hex codes, fonts, tone of voice and the photo or illustration style you use. This is your brand kit. Many AI design tools let you upload it once, and if yours does not, paste the colors and style words into every prompt.
Know your platform and dimensions
Each platform shows images in a different shape, so decide where the post will go before you generate anything. A square image cropped into a vertical story cuts off the text, and a wide image shrinks to a thin strip in a portrait feed. The table of image sizes later in this guide gives the numbers for each platform.
Have a content idea, even a rough one
You do not need a finished plan. You need one message, one audience and one action you want the viewer to take. A rough idea such as a weekend sale for local customers is enough to start, because the tool can help you shape the headline and the layout. If you have nothing to start from, take an existing article and pull out its key points, as the guide on how to write blog posts with AI explains, then turn each point into a graphic.
How to create social media graphics with AI step by step
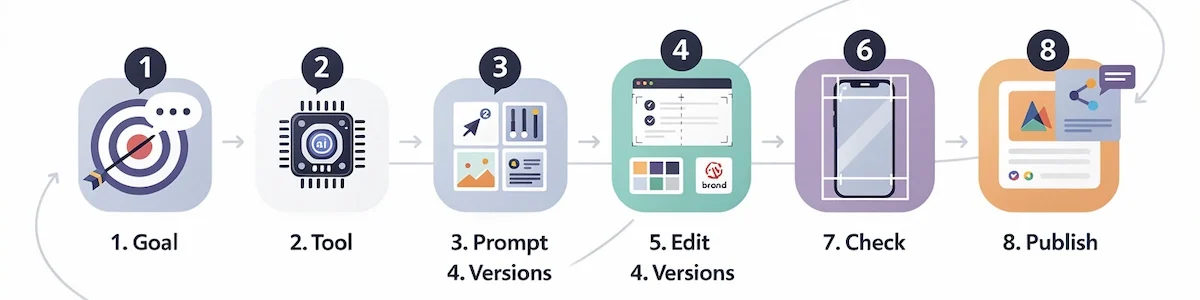
Follow these eight steps in order for your first few posts. Once the process feels natural, you will know which steps to shorten and which ones deserve more time. The goal is a graphic that looks like it came from your brand and not from a generic tool.
1. Define the goal and the message
Decide what the post has to do: announce something, teach something, sell something or start a conversation. Then write the message in one short line, ideally six to eight words, because that line becomes the headline on the graphic. Choose the format at the same time, such as a single image, a carousel or a story, and decide what you want people to do next.
2. Choose an AI tool
There are two kinds of tools. General image generators such as Midjourney, DALL-E and Adobe Firefly create pictures from a prompt and give you a lot of creative range. Design platforms such as Canva, Adobe Express and Piktochart add templates, text, brand settings and resizing on top of AI generation. For graphics that carry text and a logo, a design platform is usually easier. If you are choosing for a team, the guide on how to choose AI tools for business lists what to check first.
3. Write a clear prompt
A good prompt describes the subject, the style, the colors, the composition, the format and what to do about text. The more specific you are, the less time you spend fixing the result. Say how much empty space you need, which part of the image should stay clear for the headline, and which colors to use. Structure matters more than length, and a short prompt with clear parts beats a long and vague one.
Here is a simple example: a vertical 4:5 graphic for a bakery weekend sale, warm orange and cream colors, flat illustration style, a croissant in the lower third, a large empty area at the top for the headline, no text in the image.
4. Generate several versions
Never settle for the first result. Generate four to six versions, compare them side by side and pick the one with the clearest focal point. If one is close, ask the tool for variations and change only one thing at a time, such as the background color or the position of the subject. Keep the versions you do not use, because they are useful for testing later.
5. Edit and refine in a design editor
Open the best version in a design editor and add what the AI cannot do reliably: your exact headline, the logo, the call to action and any small text. Crop to the right ratio, fix the spacing and remove anything that distracts from the message. Keep one clear focal point, and move the text onto a calm part of the image so it can be read at a glance.
6. Match the design to your brand
Check the colors against your hex codes, switch the fonts to your brand fonts and place the logo in the same spot you use on other posts. Then put the graphic next to your last nine posts in a grid preview. If it looks like it belongs to another account, adjust the colors, the style or the layout before you publish.
7. Check text, contrast and safe zones
View the graphic at phone size, because most people will see it there. Read every word, check the spelling and make sure the text stands out from the background. Also keep important text inside the safe zone, away from the edges and from the areas where the platform places buttons, names and captions, which is especially important for stories and vertical video covers.
8. Export, publish and test
Export the final file as a PNG or JPG in the correct size for the platform, and add a caption with a clear call to action, relevant hashtags where the platform uses them, and alt text that describes what the image shows. After publishing, watch the saves, shares, clicks and comments. Use the versions you kept in step 4 to test a second graphic against the first and learn which style your audience prefers.
What makes a social media graphic stand out?
People scroll fast, so a graphic has about a second or two to earn attention. Design guides agree on a short list of habits that make an image easy to understand at a glance, and each one is worth building into your prompt and your edit.
- One clear focal point. The eye should know where to land. A single subject, face or object works better than a crowded scene.
- Strong contrast. Bold colors and a clear difference between text and background make the graphic readable on a small screen.
- A short, large headline. A few words in a bold font beat a paragraph that nobody reads.
- Emotion. A face, a surprising image or a relatable situation gives people a reason to stop and react.
- Shareability. Content that is useful, funny or relatable gets saved and shared, so ask yourself why someone would send it to a friend.
- A native feel. A polished look works on LinkedIn, while a more casual, raw style fits TikTok. Match the tone of the platform.
Best AI prompts for social media graphics
The best AI prompts for social media graphics follow a simple formula: subject, style, colors, composition, format and a note about text. Start with that structure, then change the words in brackets to fit your post. Most tools also accept a negative prompt, which lists what you do not want, such as extra text, a watermark or distorted hands. The guide to prompt engineering for business explains how to structure instructions so the output is easier to control.
| Graphic type | Prompt example |
|---|---|
| Quote card | Square quote card, plain cream background, a calm area in the center for large text, small leaf icon in one corner, lots of empty space, no text in the image. |
| Announcement | Vertical 4:5 announcement graphic for [event], warm [color] palette, flat illustration, empty band at the top for the headline, no text in the image. |
| Promotion | Bold sale graphic for [product], high contrast, [brand colors], product in the lower half, clear space for a discount badge and a call to action. |
| Carousel slide | Slide 1 of a carousel about [topic], simple background in [brand colors], large empty area for a headline, same style for every slide. |
| Infographic | Clean infographic layout with three sections and simple icons, [brand colors], plenty of white space for short text, easy to read on a phone. |
| Product visual | Product photo of [item] on a [surface], soft natural light, [color] background, space on the left for text, realistic style. |
| Thumbnail | 16:9 thumbnail, expressive face on the right, bright contrasting background, empty area on the left for three to five words. |
Keep a prompt library of the versions that worked. When you find a prompt that gives you the right style, save it, and reuse it with new subjects so your graphics keep the same look.
Two more habits improve results quickly. First, add style keywords that describe the look you want, such as flat illustration, minimalist, soft natural light, bold typography or watercolor. Second, describe the composition, including where the subject sits and which part of the frame stays empty for text. Avoid vague words like nice or cool, avoid stacking many unrelated styles in one prompt, and avoid asking for long sentences inside the image.
How to fix text in AI images
Garbled letters, misspelled words and odd spacing are the most common complaint about AI graphics. Image models treat letters as part of the picture and not as language, so small text gets less attention than the overall composition. Long lines, busy backgrounds and brand fonts make the problem worse, which is why text in AI images often needs a different workflow.
- Generate the background without text. Ask for an empty area where the headline will go, and add the words later.
- Add the text in an editor. A design tool gives you exact spelling, your brand font and full control over size and spacing.
- Keep the copy short. If the words must be inside the image, use a few large words and nothing else.
- Simplify the scene. Rain, reflections and crowded objects confuse the text, so use a calm, high-contrast background.
- Check at the smallest size. If you cannot read it on a phone, it is too small or too low in contrast.
- Re-generate only when the text is the idea. Otherwise it is faster to edit than to try again.
Social media image sizes by platform
Using the right social media image sizes keeps your text from being cropped and your image sharp. The table below follows the recommended sizes listed by PostEverywhere, which shows an update in October 2026, and it matches other size guides for most platforms. Platforms change their layouts often, so confirm the numbers in your scheduling tool before a big campaign.
| Platform | Format | Size in pixels | Aspect ratio |
|---|---|---|---|
| Feed post, portrait (recommended) | 1080 x 1350 | 4:5 | |
| Feed post, square | 1080 x 1080 | 1:1 | |
| Stories | 1080 x 1920 | 9:16 | |
| Feed post and link preview | 1200 x 630 (portrait 1080 x 1350) | 1.91:1 (4:5) | |
| Post image | 1200 x 627 | 1.91:1 | |
| X | In-stream image | 1600 x 900 | 16:9 |
| TikTok | Video cover and photo posts | 1080 x 1920 | 9:16 |
| Standard pin | 1000 x 1500 | 2:3 | |
| YouTube | Thumbnail | 1280 x 720 | 16:9 |
For carousels, give every slide the same aspect ratio, or the post will crop unevenly. Design for the largest size you need, then use a resize feature to create the other versions instead of starting over.
Platform-specific tips for social media graphics
The same idea needs a different shape and tone on each platform. Create the main version first, then adapt it instead of posting one file everywhere
Use portrait 4:5 for feed posts, because it takes up more of the screen than a square, and 9:16 for stories. Keep text away from the top and bottom edges of stories, where the interface covers the image. Carousels work well for tips, steps and before and after posts.
Use landscape images of at least 1200 x 630 pixels for link previews, and portrait or square images for regular feed posts. Keep the message short and put the key words in the center, where cropping is less likely to cut them.
LinkedIn audiences expect a polished, professional look. Landscape 1200 x 627 images work well for posts, and carousels suit how-to content, data points and lessons learned. Use clean typography and a limited palette.
X
Landscape 16:9 images at 1600 x 900 pixels fit the in-stream preview. Keep the graphic simple, because it appears small in a fast-moving feed, and let the post text carry the detail.
TikTok and Reels
Design for vertical 9:16 and keep the style closer to native content than to an advertisement. A cover with a strong hook and large text helps, and the safe zone matters most here, because buttons and captions cover a large part of the frame.
Pinterest and YouTube
Pinterest favors vertical pins at a 2:3 ratio, and square pins tend to perform worse. For YouTube thumbnails, use 1280 x 720, an expressive face or a clear object, and three to five words of high-contrast text.
Types of social media graphics you can create with AI
AI works well for several kinds of social media graphics, and each one needs a slightly different prompt and layout.
- Quote cards. One idea per card, large text, a simple background and the speaker name when you quote someone.
- Announcements. Launches, events and news with a clear date and a single call to action.
- Promotions and seasonal posts. Sales, offers and holiday graphics, where contrast and a clear discount matter most.
- Carousels. A hook on the first slide, one point per slide and a closing call to action. The same style across all slides is the key.
- Infographics. Short facts or steps, simple icons and brand colors, with only the key points highlighted.
- Before and after. Two images with the same framing, useful for makeovers, edits and results.
- Thumbnails. A face or a strong object, three to five words and high contrast for small sizes.
- Product visuals. Clean product shots with a new background, and clear space for a price or a badge.
Once a still graphic works, you can also add motion to it for stories and short videos. The guide to AI video creation shows how to turn the same idea into a clip.
How to create a carousel with AI
A carousel is a series of slides that people swipe through, and it is one of the best formats for teaching and storytelling. AI helps most with planning and with keeping every slide in the same style.
- Plan the slides. Write one point per slide, a strong hook for slide one and a call to action for the last slide.
- Set the style once. Generate or choose a background and layout for the first slide, then reuse it for all the others.
- Add the content. Paste your text slide by slide, or use a tool that turns an outline into slides.
- Customize for your brand. Apply your colors, fonts and logo, and check that the slides look like one set.
- Use one aspect ratio. Every slide must have the same size, or the post will crop unevenly.
- Review the order and export. Read the slides in sequence, check that each one makes sense on its own, and export the full set.
AI tools for creating social media graphics
You do not need many tools, and most workflows run on one design platform plus, if you want more creative range, one image generator. Free plans have limits and prices change, so check the current plans on each site before you pay.
| Tool | Best for |
|---|---|
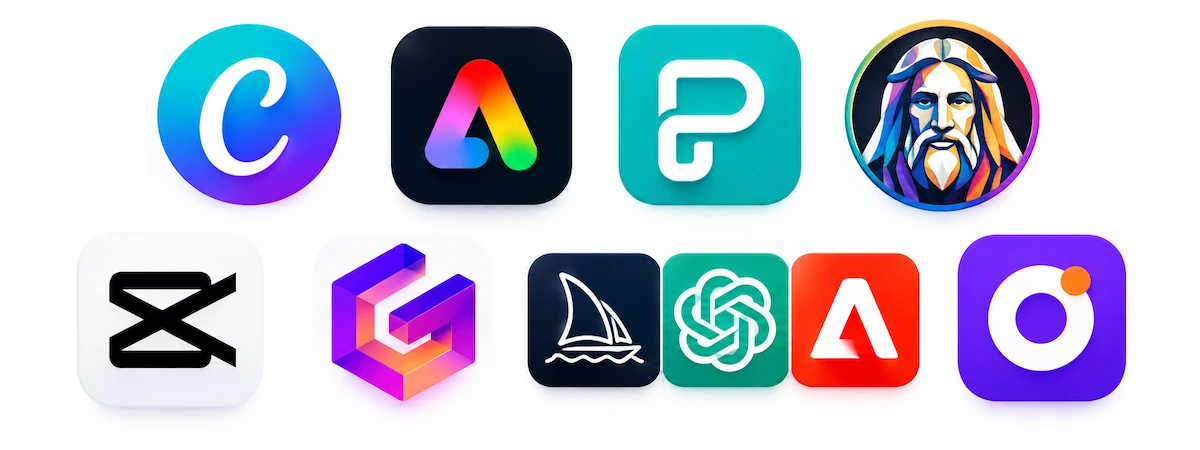
| Canva | Prompt-based images with Magic Media, layouts with Magic Design and resizing with Magic Switch. |
| Adobe Express | Templates, text-to-image generation and resizing a design for all channels. |
| Piktochart | Editable posts, infographics and carousels from a text prompt. |
| Leonardo.Ai | Image generation, background changes, resolution changes and upscaling. |
| CapCut | AI design layouts with brand elements, plus export and scheduling. |
| Gamma | Carousels and slide-style graphics built from your content. |
| Midjourney, DALL-E, Adobe Firefly | Creative, stylized images and backgrounds that you finish in an editor. |
| Orshot | Branded graphics generated at scale from templates, spreadsheets or an API. |
There is also the question of AI design versus templates. Templates are faster when you repeat the same format every week and want a fixed layout. AI is better when you need a new idea, a custom background or a visual that does not exist in a template library. In practice, the best results come from using both: generate the image with AI, then place it in a template that carries your brand. The guide to building an AI tool stack for business shows how to connect these pieces without paying for overlapping features.
AI or a graphic designer: which one do you need?
For most routine posts, AI plus a good template is enough. It is quick, it makes many variations and it lets non-designers produce acceptable work. A graphic designer is still the better choice for work that defines how your brand looks: a logo, a visual identity, a campaign concept or an original illustration style.
Pricing also works differently. Some tools charge a flat monthly fee, others limit AI use with monthly credits, and a designer charges for time or per project. Compare what you post each month, how much editing you need and how much control you want over the final result. Many teams use both, with a designer setting the brand rules once and AI producing the weekly volume. If you run a small team, the guide to AI for small business shows where these tools pay off first.
How to keep your brand consistent with AI graphics
AI tools produce a new look every time unless you tell them otherwise, so brand consistency has to be built into your process. Start with a one-page brand document: hex codes, fonts by use case, logo rules, the style of photos or illustrations you use and a few examples of what to avoid.
Then turn that document into a master prompt, a base instruction with your style, palette and composition rules. For each new graphic, add only the subject and the platform, and leave the master prompt unchanged. If your tool supports reference images, upload two or three posts that show your style and use them with every prompt. Build a small template family, with the same core layout in each size, so a post looks the same on every platform. Finally, review each new graphic against your last posts before publishing, because brand consistency is easier to protect than to repair.
Other ways to use AI on your social media graphics
AI is useful after the first draft too. These jobs often save more time than generating the image.
- Change the background. Replace a plain or messy background without reshooting the photo.
- Extend the image. Expand a vertical photo into a horizontal one, or the other way around, to fit a different format.
- Adapt for each platform. Resize one design into the ratios you need, with tools such as Magic Switch in Canva.
- Upscale. Increase the resolution of a small or soft image before you upload it.
- Remove distractions. Erase unwanted objects or clean up a product photo.
- Localize. Adapt the text on a graphic for another language or market, and ask a native speaker to check it.
- Animate. Add simple motion to a still graphic or turn an image into a short video.
Tips for getting better results
- Stop the scroll. You have a second or two, so use strong contrast, a clear focal point and one bold visual idea.
- One message per graphic. If you need two messages, make two graphics or a carousel.
- Keep text large and short. Use a few words, a bold font and enough space around them.
- Be descriptive in the prompt. Mention style, colors, composition and the empty space you need.
- Generate variants. Create several options and test different tones, such as playful and serious, before choosing.
- Upscale before you upload. A sharper image looks better on large screens and survives compression.
- Keep a human in the loop. A person should review every graphic for spelling, facts and brand fit.
Common mistakes to avoid
Most weak AI graphics come from skipped steps and not from the tool. Check this list before you publish.
- Using the wrong dimensions. A cropped headline looks careless, so design for the platform from the start.
- Putting too much text on the graphic. If it needs a paragraph, it belongs in the caption.
- Trusting the spelling. AI often misspells words in images, so read every word yourself.
- Ignoring safe zones. Buttons and captions can cover text near the edges.
- Using a generic look. An image that could belong to any brand will not stand out in the feed.
- Skipping the call to action. Tell people what to do next, such as visit, save or share.
- Writing a vague prompt. One short line produces a picture that fits everyone and no one.
- Using the same graphic everywhere. Adapt the size and the message for each platform.
- Posting without a schedule. A strong graphic helps less when it appears at random times.
Checklist before you publish
A short checklist catches the errors that AI and busy schedules cause. Run through it for every graphic, and keep a person responsible for the final approval.
- The message is clear in one glance, and there is one call to action.
- Every word is spelled correctly, including names and numbers.
- Text has strong contrast with the background and is readable at phone size.
- Important text sits inside the safe zone.
- The size and aspect ratio match the platform.
- Colors, fonts and logo match your brand kit.
- The image has no odd details, such as extra fingers, warped objects or strange shadows.
- Alt text describes the image, and the caption and hashtags are ready.
- You have checked the license of the tool and the labeling rules of the platform.
How to create social media graphics faster
Once the process works, speed comes from batching and reuse. Most of the time you save does not come from a faster prompt but from making fewer decisions each time.
- Batch your work. Plan a week of posts at once, then generate and edit all the graphics in one block of time.
- Use a content calendar. Decide the topic, format and platform for each post in advance, so you start with a message and not a blank page.
- Build one template family. Keep the same layout in every size and swap only the image and the headline.
- Resize, do not redo. Design once and use a resize feature for the other platforms.
- Save your best prompts. A prompt library turns a good result into a repeatable one.
A simple weekly rhythm keeps the process steady. This is a sample schedule that you can adjust to your own calendar.
| Day | Task |
|---|---|
| Monday | Plan the week, write the messages and generate all the graphics in one batch. |
| Tuesday to Friday | Schedule or post one graphic a day, and answer comments. |
| Weekend | Review the results, note which graphics worked and save the best prompts. |
If you publish at volume, you can go one step further and automate. A spreadsheet row with a headline and an image link can trigger a template and return a finished graphic, using tools such as Make together with a graphics API. This logic is covered in the guide to AI marketing automation. Keep a person in charge of the final check, because an automated graphic can still contain a spelling error or an off-brand color.
You can also build graphics from content you already have. A finished article can supply the key points for a carousel, a quote card or a short infographic, which saves you from inventing new ideas for every post. For small teams without a designer, these tools save the most time on routine graphics, and a human designer still adds value in building the brand identity itself.
Copyright, licensing and labeling AI graphics
Before you use AI graphics for a brand or a client, read the terms of your tool. Rules on commercial use and on who owns the output differ between tools and between free and paid plans, so check the license page instead of assuming. Avoid uploading confidential product images, customer photos or unreleased designs unless you know how the tool stores and uses them. The guide to AI data privacy for business lists what to check.
Platforms also have their own rules for AI content. Meta, for example, says it labels content when it detects industry standard AI image indicators or when people disclose that they are uploading AI-generated content, and the label is now called AI info. Meta later changed the rules so that content only edited with AI tools gets the label in the post menu and not on the post itself, as described on its page about the approach to labeling AI-generated content. Ads follow separate disclosure rules. These policies change, so check each platform before you publish, and when in doubt, add a short note in the caption.
Conclusion
You can create social media graphics with AI in minutes, but the quality still comes from the process around the tool: a clear message, a specific prompt, an edit in a design editor, a check against your brand and the right size for each platform. Let the AI produce the first draft, add your text and logo yourself, and always review the result before it goes live.
Start with one platform and one type of graphic, build a prompt library and a template family, and expand from there. With a repeatable setup, a week of posts takes far less time than it did before, and your feed looks consistent from the first post to the last.
FAQs about creating social media graphics with AI
Can AI create professional-looking social media graphics?
Yes, especially when you use a design platform that combines AI generation with templates and brand settings. The result looks professional when you add your own text and logo, check the spelling and match the colors to your brand.
Do I need design skills to create social media graphics with AI?
No. You need a clear message and a descriptive prompt, and the tool handles the layout. Basic design sense still helps, for example in choosing readable text, strong contrast and one focal point.
How do I create social media graphics with AI for free?
Several design platforms and image generators offer free plans that include AI generation. They usually limit the number of generations or the export options, so check what the free plan includes before you rely on it. The guide on how much AI tools cost helps you compare paid options.
What is the best AI tool for social media graphics?
There is no single best tool. Canva, Adobe Express and Piktochart are practical when you need templates, text and resizing in one place, while Midjourney, DALL-E and Leonardo.Ai give more creative range for images. Choose based on how much editing and branding you need.
How do I keep my brand consistent when using AI?
Write a brand document with your hex codes, fonts and style, turn it into a master prompt, and use reference images and templates for every post. Compare each new graphic with your recent posts before publishing.
How do I add text to AI-generated graphics?
Generate the image with an empty space for the headline, then add the text in a design editor. This gives you exact spelling and your brand font, and avoids the garbled letters that AI often produces inside images.
Can I use AI-generated graphics for commercial purposes?
It depends on the tool and the plan. Read the license and terms of the tool you use, and check if the rules differ between the free and paid versions. If you work for clients, keep a record of which tool created each graphic.
Do I need to label AI-generated images?
It depends on the platform. Some platforms add a label automatically when they detect AI indicators or when you disclose, and ads can have extra rules. Check the current policy of each platform you post on.
Will AI graphics hurt my engagement?
Not by themselves. People respond to graphics that are clear, relevant and on brand, and they ignore generic ones. Add your own message and brand style, test different versions and watch your results.
How long does it take to create a social media graphic with AI?
A first draft takes seconds, and a finished graphic usually takes 10 to 15 minutes once you have a brand kit and a prompt that works. The time goes into editing the text, checking the brand and exporting the right sizes.
Can AI create Instagram posts automatically?
AI can generate the image, the layout and even a draft caption, and scheduling tools can publish the post at a set time. A person should still review each graphic before it goes live, because errors in text and details are common.
Which AI tool is best for LinkedIn carousels?
Choose a tool that builds slide-style content and keeps the same layout on every slide, such as Canva, Gamma or Piktochart. The best choice depends on how much editing and branding control you need.
What file format should I export social media graphics in?
PNG gives sharp text and flat colors, so it suits graphics with text, while JPG gives smaller files for photos. Check the size limit and the recommended format of the platform before you upload.
What is the difference between AI design and using templates?
A template gives you a fixed layout that you fill with your content. AI design creates a new image or layout from your description. The best workflow often combines both, with AI creating the visual and a template carrying the brand.