A photographer can cost around $175 for a single product image, while an AI tool can produce one for roughly $0.50 to $2, according to a comparison cited in Shopify’s guide to AI product photography. That gap is why so many sellers want to learn how to create product photos with AI.
The catch is accuracy. An image with the wrong size, a changed color or a garbled label does not save money. It creates returns and complaints. Good AI product photos start with a real photo of your product, keep that product unchanged and replace only the scene around it.
This guide covers the whole process: a clean base photo, background removal, the right shot type, prompts you can copy, how to check the result, image sizes for Amazon and Shopify, and a checklist you can use today.
How to create product photos with AI in 6 steps
To create product photos with AI, shoot one clean photo of the real product, remove the background, pick a shot type, write a prompt that keeps the product unchanged, generate four or five variants and check each one before you export.
- Prepare the base photo. Sharp, evenly lit, plain background, product fills the frame.
- Remove the background. You get a clean cutout of the product.
- Choose the shot type. Studio, lifestyle, detail, scale, on-model or flat lay.
- Write the prompt. Describe the surface, setting, light and mood, and state what must not change.
- Generate variants. Make four or five options, not one.
- Check, fix and export. Review shadows, scale, edges and text, then save in the size each channel needs.
The sections below explain each step, with prompts, tool options and the rules of the main marketplaces.
What AI product photography is (and what it is not)
AI product photography uses image models to build or edit the scene around a product photo. The tool can generate a new background, change the light, add shadows or place the item in a room. Some tools also show the product on a model. It is one use of AI content creation, and the guide on AI content creation covers the other formats, such as text and video.
How AI product photography works
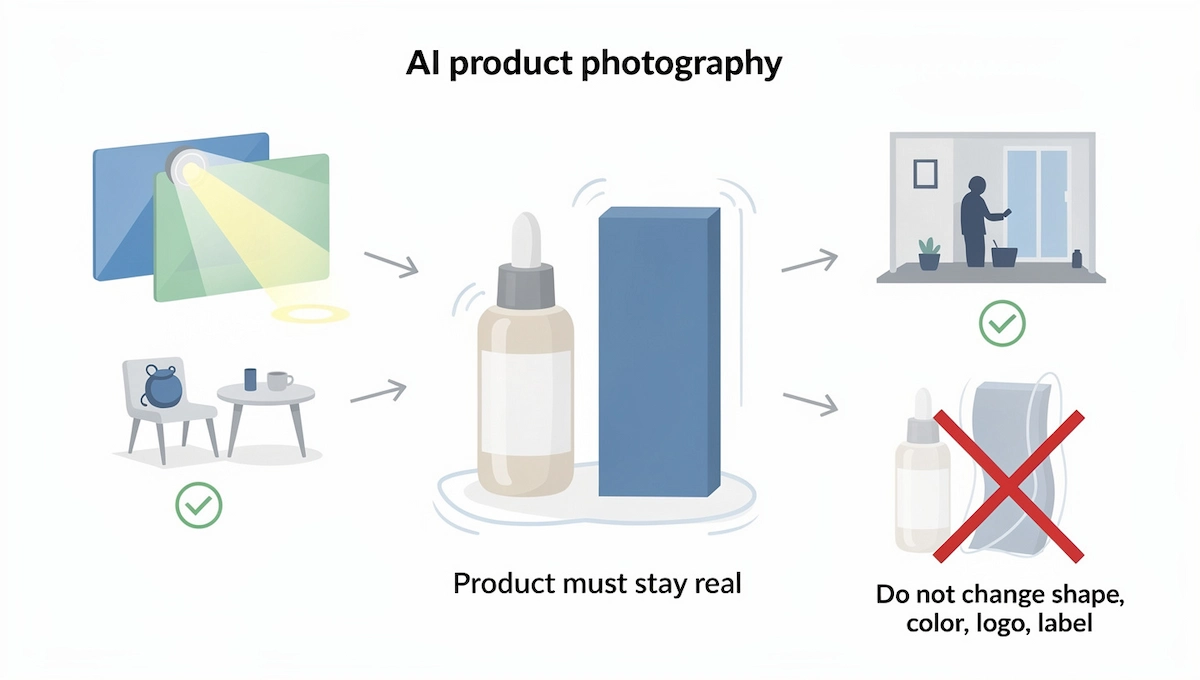
AI product photography combines a few steps. A segmentation model finds the product and separates it from the background. An image model then generates a new scene from your text description, and the tool adds light and shadow so the product sits in that scene. Some tools also raise the resolution or retouch small flaws. Each step can add errors, so the quality of the cutout and the clarity of the prompt decide most of the result.
What AI can change and what it should never change
AI is good at the surroundings: backgrounds, light, shadows, props and mood. It should not touch the product itself. The shape, color, size, proportions, number of parts, logo and label text must match the real item. If any of these change, the customer receives something different from the picture.
AI product photos vs traditional studio photography
Neither option wins everywhere. This table shows where each one fits.
| Factor | Studio photo | AI product photo |
|---|---|---|
| Cost per image | Around $175 in one cost comparison | Roughly $0.50 to $2 in the same comparison |
| Time | Booking, shooting and editing take days or weeks | Minutes per image, plus review time |
| Variations | Every new scene needs a new setup | Many scenes from one base photo |
| Accuracy | The real product is in the picture | Can drift, so every image needs a check |
| Consistency | Controlled by one setup and one photographer | Needs a style guide and repeated prompts |
| Best for | Main images, reflective or complex products | Secondary images, lifestyle shots, seasonal variants, tests |
Products that do not exist yet
AI product photos can also help before a product is made. A brand can show a concept in several settings, test which one gets clicks and decide what to produce. Treat those images as concept art, and replace them with real photos before the product goes on sale.
Why create product photos with AI
Sellers move part of their photography to AI for three main reasons: cost, speed and variety.
- Lower cost per image. A set of scenes costs a fraction of a studio day.
- Faster turnaround. A new scene takes minutes, with no booking, no shipping of samples and no waiting for edits.
- More variants. One base photo can become a studio shot, a lifestyle scene, a seasonal version and a test image.
- Consistent backgrounds. A fixed prompt keeps the same look across a catalog.
- Room to test. Cheap variants make it easy to compare what shoppers click.
The limits are just as real. AI still needs a clean base photo, every image needs a check against the real product, and reflective or detailed items can come out wrong. Treat AI as a way to get more good pictures, not as a way to skip quality control.
Where AI product photos help most
Not every use needs the same level of accuracy. These are the places where AI product photos usually pay off:
- Catalog images on a consistent background
- Lifestyle images for product pages and ads
- Seasonal and holiday versions of the same product
- Regional versions with local settings for different markets
- Concept images and mockups before production
- Social posts, email banners and ad creatives
- Test images for A/B tests
A social post can tolerate a loose scene, while a product page cannot tolerate a changed label. Match the checks to the use.
What you need before you start
The quality of your AI product photos depends on the base photo more than on the tool. A weak source gives a weak output, however good the prompt is.
Source photo requirements
- Sharp focus on the whole product, with no motion blur
- Even light without hard shadows or color casts
- Plain background in white or a light solid color, which makes background removal cleaner
- Product fills most of the frame, with a small margin around it
- At least 1000 pixels on the longest side, and more for products with fine detail
- Angle that matches your goal, because AI rarely fixes a wrong perspective
How to shoot a clean base photo with a phone
A modern phone is enough. Place the product on a white sheet or foam board near a window, and avoid direct sun. Put the phone on a stable surface or a small tripod, and keep it level with the product. Shoot from the same angle you want in the final picture, because a flat front view does not turn into a three-quarter view without distortion.
Take several shots and pick the sharpest. Wipe fingerprints and dust off glossy products before you press the button, since AI will copy them into every scene.
| Check | What to look for |
|---|---|
| Sharpness | Text and edges are crisp when you zoom in |
| Background | Plain, with no patterns or clutter |
| Exposure | No blown highlights or dark patches on the product |
| Framing | Whole product visible, even margin |
| File | At least 1000 px, saved as JPG or PNG |
How to create product photos with AI: step by step
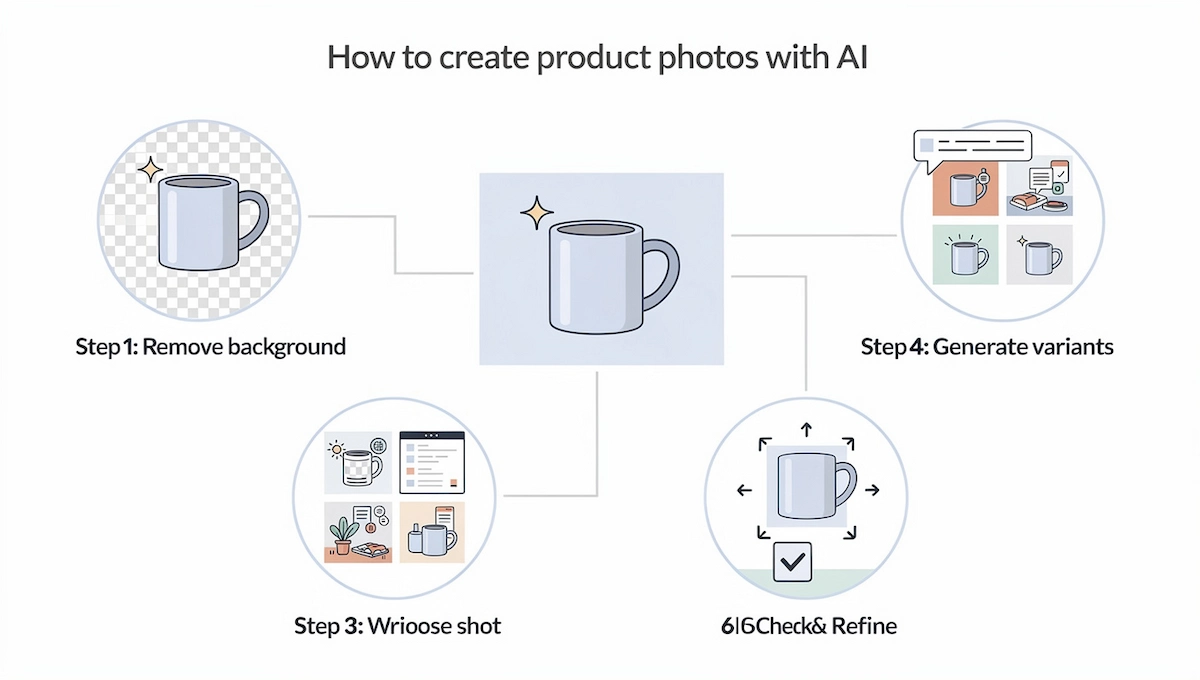
These six steps work with most AI product photography tools, from Shopify’s built-in editor to dedicated apps. The names of the buttons change, but the order stays the same.
Step 1: Prepare the photo and remove the background
Upload the base photo and use the background removal option. Zoom in and check the edges, especially around hair-thin parts, handles, straps and transparent areas. Fix rough edges before you go on, because a bad cutout makes the product look pasted onto the scene. Save the result as a PNG with a transparent background, and keep the original file untouched.
Step 2: Choose the shot type
Decide what the image has to do before you write a prompt. Different jobs need different pictures.
| Shot type | What it shows | Where to use it |
|---|---|---|
| Studio shot (packshot) | Product alone on a clean background | Main image, marketplace listings |
| Lifestyle shot | Product in a room or an outdoor setting | Product page, ads, social posts |
| Detail shot | Close-up of material, stitching or texture | Product page gallery |
| Scale shot | Product next to a familiar object or in a hand | Listings where size causes returns |
| On-model shot | Product worn or held by a person | Clothing, accessories, ads |
| Flat lay | Product viewed from above with props | Social media, email, blog |
| Seasonal variant | Same scene with a holiday or seasonal theme | Campaigns and promotions |
Step 3: Write a prompt that keeps the product intact
A good prompt is a short description, not a conversation. Use this order: the product with its material, color and size, the surface it sits on, the setting, the light, the camera angle, the mood, and one sentence that says what must stay unchanged. Specific words beat vague ones. “On a light oak table with soft morning light from the left” gives better results than “in a nice kitchen.”
Add the size of the product when it matters, for example “an 8 oz candle” or “a 12 oz mug,” so the tool keeps the proportions realistic. Always add a constraint such as “keep the exact shape, label text and colors of the reference photo.” The guide on prompt engineering for business explains how to write instructions like this for any AI tool.
Weak prompt: “Put my mug in a cozy kitchen.”
Better prompt: “Matte white ceramic mug, 12 oz, on a light oak kitchen table, morning window light from the left, soft shadow under the mug, shallow depth of field, calm and warm mood. Keep the mug shape, handle and logo exactly as in the reference photo.”
Step 4: Generate four or five variants, not one
The first of your AI product photos is rarely the best one. Generate a batch of four or five, compare them side by side and keep the two or three that look right. Changing one detail per batch, such as the surface or the light, shows you what the tool responds to. If you need many products to look alike, reuse the same prompt wording and the same settings for each.
Step 5: Refine with short directions
Do not rewrite the whole prompt when an image is almost right. Give one short instruction at a time: “make the light softer,” “add more empty space on the right,” “move the product slightly left.” Small steps keep the parts you like. If a detail is wrong and the tool cannot fix it, correct it by hand in a photo editor, or discard the image.
Step 6: Check, fix and export
Review every one of the AI product photos at full size before it goes anywhere. Compare it with the real product: shape, color, label text, logo and proportions. Check the shadows, the edges and the scale. Then export in the size each channel needs, which the section on image sizes below lists. Keep the prompt and the result together in a file, so you can repeat a good one later.
Example: prompts for a ceramic mug, from phone photo to listing images
Say you sell a matte white mug and have one phone photo on a white sheet. After the cutout, you can build a small set from four prompts. The brackets show what to replace for your own product.
- Studio: “Matte white ceramic mug, 12 oz, centered on a pale gray plain backdrop, soft diffused light from the left, gentle shadow, straight-on view at eye level. Keep the mug shape, handle and logo unchanged.”
- Lifestyle: “The same mug on a light oak table beside a notebook and a small plant, morning window light, shallow depth of field, warm mood. Do not change the mug or the logo.”
- Detail: “Close-up of the mug handle and rim, soft side light, blurred kitchen background, sharp focus on the ceramic texture.”
- Fix: “Make the light softer and warmer and leave more empty space on the right. Keep everything else the same.”
AI product photography prompts you can copy
These templates work for AI product photography in most tools. Use this formula and fill in the brackets: [product, material, color, size] on [surface], in [setting], [light], [camera angle], [mood]. Keep the exact shape, label text and colors of the reference photo. No extra objects.
Studio and marketplace prompts
- “[Product] centered on a pure white background, soft even light, straight-on view, light shadow beneath the product. Keep the shape and label text unchanged.”
- “[Product] on a pale gray gradient backdrop, soft top light, slight three-quarter angle, clean and minimal.”
Lifestyle prompts
- “[Product] on a wooden kitchen counter, morning window light, a bowl of fruit out of focus behind it, warm and calm.”
- “[Product] on a bathroom shelf next to a folded towel and a plant, soft daylight, clean and bright.”
- “[Product] on an outdoor table at golden hour, blurred garden in the background, relaxed mood.”
Detail and scale prompts
- “Close-up of [part of the product], soft side light, shallow depth of field, sharp focus on the texture.”
- “[Product] held in one hand against a plain background, natural size, soft light, no other objects.”
Seasonal and flat lay prompts
- “[Product] on a dark wooden table with pine branches and warm string lights out of focus, winter evening mood.”
- “Flat lay of [product] on a linen cloth with dried flowers and a small notebook, seen from directly above, soft daylight.”
Prompts by product type
| Product type | What to add | What to watch |
|---|---|---|
| Jewelry | Close macro, soft light, neutral backdrop | Reflections, stones and clasps that change shape |
| Clothing | Flat lay, hanger or on-model setting, fabric texture | Fit, seams and prints that drift |
| Cosmetics | Clean surface, soft light, a few props such as water drops or leaves | Label text and cap shape |
| Food and drink | Natural light, a plate or board, warm tones | Portion size and realistic texture |
| Furniture and decor | Room setting, scale cues such as a rug or door frame | Proportions and shadows on the floor |
| Electronics | Clean studio light, straight angle | Ports, buttons and screen content |
Useful words for light, angle and mood
| Category | Words to try |
|---|---|
| Light | soft diffused light, window light, golden hour, rim light, even studio light, overcast daylight |
| Angle | straight-on, three-quarter view, 45-degree angle, top-down, eye level, low angle |
| Distance | close-up, macro, medium shot, wide shot with space around the product |
| Depth | shallow depth of field, sharp focus on the product, blurred background |
| Composition | centered, negative space on the right, minimal props, rule of thirds |
| Mood | calm, warm, bright, clean, premium, cozy, fresh |
Pick one or two words from each row. Too many style words pull the image in different directions.
More ways to use AI on product images

On-model photos and ghost mannequin
For clothing and accessories, some tools place your product on an AI model or turn a mannequin photo into a ghost mannequin view, where the mannequin is removed and the garment looks worn. Start with a clean flat lay or mannequin photo, choose a model type close to your customers and check fit, fabric folds, seams and prints at full size. Hands, faces and body proportions still produce errors. Some marketplaces and ad platforms ask you to label photorealistic AI people, so check the current rules for each channel.
Infographic and feature images
AI image models often garble text, so do not ask them to write your callouts. Generate the clean image first, then add feature labels, icons and sizes in an editor such as Canva or Adobe Express. On Amazon, the additional image slots are the place for feature images, while the main image stays clean. One message per image reads better than a crowded one.
Short product videos from photos
Several tools can animate a still product photo into a short clip with a slow zoom, a rotating view or a moving background. Google Product Studio can generate short product videos for merchants in some countries, and availability changes by region. Apply the same checks as for photos, because motion makes distortions easier to see. Keep clips short, and use them on product pages, social posts and ads.
Improve photos you already have
You do not always need to generate a scene. AI editing tools can raise resolution, fix lighting, correct colors, remove dust and small marks and clean up a distracting background in one step. Adobe Express has an AI assistant that takes plain instructions one step at a time, such as “brighten the product and soften the shadow.” This is the lowest-risk use of AI, because the product itself stays untouched.
Best tools to create product photos with AI
Choose an AI product photography tool for the job you repeat most, not for the prettiest gallery on its homepage. Plans and limits change often, so confirm the current details, and see the guide on how much AI tools cost for typical price ranges.
| Tool | Best for | What to check |
|---|---|---|
| Shopify Magic and Sidekick | Quick edits inside the Shopify admin | Output resolution, one scene at a time, current limits |
| Google Product Studio | Free scene generation and background removal | Experimental, limited countries, not for hands, wall art or light fixtures |
| Photoroom | Fast batch edits and backgrounds | Watermark and commercial-use terms on the free plan |
| Pebblely | Simple product scenes | Paid plans start at about $9 for 30 images and about $39 for 500 |
| Pixelcut | Mobile editing and background generation | Export limits and plan features |
| Canva | Turning photos into finished graphics | Not built only for product photography |
| Adobe Express and Firefly | Teams already working in Adobe | Beta features and credit limits |
| Flair | Art-directed campaign scenes | Less suited to plain marketplace images |
Free ways to start
You can create AI product photos without paying. Google Product Studio is free inside Merchant Center and the Google and YouTube app on Shopify. It generates scenes, removes backgrounds and raises resolution, and Google says it is experimental and works best with certain products. Shopify merchants also have Magic and Sidekick in the admin, and most dedicated apps offer a free tier with limits. Free plans often add a watermark or restrict commercial use, so read the terms before you publish anything.
General image generators vs product tools
ChatGPT, Gemini and Midjourney can create AI product photos from scratch, but they often redraw the whole picture, which can change the shape of the product or garble text on a label. Many product tools work differently: they cut out your item and generate only the background, which keeps the product as photographed. If you use a general generator, upload your photo as a reference, ask for an edit and state what must stay the same.
How to choose a tool
Test three tools with the same three products. Pick products that are hard, such as one shiny, one with a label and one with fine detail. Count how many images out of ten you would actually publish, and check labels, edges and scale. The better tool is the one with the most usable images per dollar and per hour, not the one with the best sample gallery. The guide on how to choose AI tools for business gives a wider checklist for the comparison.
How to make AI product photos look real
Most fake-looking AI product photos fail in the same six places. Check these before you export.
Lighting
The light on the product must match the light in the scene. If the window is on the left, the bright side of the product should face left. A studio-lit product on an outdoor background looks pasted in.
Shadows
A product needs a shadow where it touches the surface, with a direction and softness that fit the light. A floating product with no shadow, or one with a shadow that points the wrong way, is the clearest sign of an AI edit.
Scale and proportions
Compare the product with the objects around it. A candle larger than the vase beside it, or a mug the size of a bucket, hurts trust. Add the real size to the prompt and include a familiar object when size matters.
Edges and cutouts
Zoom in on the outline. Look for white halos, jagged edges, missing straps and cut-off transparent parts. Fix them by hand or run the cutout again with a cleaner source photo.
Text, labels and logos
Read every word on the product at full size. AI often bends letters, invents words or changes a logo. If the label is wrong, do not use the image. Use a tool that keeps the original product pixels, or add the label back in an editor.
Hands, people and models
Hands and faces still cause problems, with extra fingers, odd grips and mismatched skin tones. Look closely at where a hand touches the product. Some tools, including Google Product Studio, do not support images with hands at all.
Image sizes and marketplace rules

AI product images that suit one channel can be wrong for another. Prepare the version each one needs.
Amazon
Amazon sets strict rules for the main image. It needs a pure white background (RGB 255, 255, 255), the product filling at least 85% of the frame, at least 1000 pixels on the longest side, and no text, logos, badges or watermarks. The main image should be a photograph of the actual product, not an illustration or a render. Additional images can use other backgrounds, including lifestyle scenes, and a listing allows up to nine images. Amazon’s policy on AI-generated images can change, so check Seller Central before you use one as the main image. Secondary images are the safer place for AI product photos, as long as they show the product accurately.
Shopify
Square AI product images of 2048 x 2048 pixels work well on Shopify product pages and keep the gallery tidy. Use the same size and the same background style across a collection, so the store looks consistent.
Etsy, eBay and other marketplaces
Each marketplace has its own rules for images, categories and how a product may be shown or described. Etsy also has policies about how items are made and sold, and AI use may have to be disclosed, so read the current seller policy before you upload AI images. On eBay and similar sites, a plain background and an accurate picture are the safe choice. When a marketplace publishes a style guide for your category, follow it over any general advice.
Social and ads
Social channels use different shapes. This table lists common sizes, and the guide on creating social media graphics with AI shows how to turn the images into finished posts.
| Channel | Common format | Size |
|---|---|---|
| Instagram feed | 1:1 or 4:5 | 1080 x 1080 or 1080 x 1350 px |
| Stories and Reels | 9:16 | 1080 x 1920 px |
| 2:3 | 1000 x 1500 px | |
| Meta ads | 1:1 | 1080 x 1080 px |
Alt text and file names
Name each of your AI product images with what is in the picture, such as white-ceramic-mug-oak-table.jpg, and write a short alt text that describes the image in plain words. Both help search engines and screen readers, and a good description also makes the page clearer for shoppers. Pair the images with strong copy, and see the guide on how to write product descriptions with AI for the text side of the listing.
File format and compression
Large files slow a page down. Export product images as compressed JPG or WebP, keep each file as small as possible without visible blur, and do not resize the same image by hand for every channel. Check the result on a phone, because most shoppers will see it there.
Cost: AI product photos vs a studio shoot
AI product photography is cheaper per image, but the plan price is not the whole cost. Your review time counts too. A useful number is the cost per usable image:
Cost per usable image = (plan price + review time cost) / number of approved images
Take an illustrative example. A plan costs $9 for 30 images, and you spend one hour reviewing and fixing them, which is worth $30. You approve 12 of the 30. The total cost is $39, so each usable image costs $3.25. That is still far below the studio figure of around $175 per image cited by Shopify, but it is more than the sticker price of $0.30 per generated image. The method is the same one used in the guide on AI ROI for business, which shows how to measure the return of any AI tool.
AI, real photos or both: a hybrid workflow with testing
You do not have to pick one side. Many sellers use a real photo for the main image and the scale shot, and AI product photos for secondary, lifestyle and seasonal pictures. That keeps the key image exactly true to life and still gives you variety at a low cost.
Then run an A/B test. Change one thing at a time, for example the background style of the second image, and compare clicks, add-to-cart rate and returns over the same period. Do not judge on a few days of traffic. If you also run the images as ads, test a few ad texts alongside them, and see the guide on how to write ad copy with AI. Keep the winner, and make the next test against it.
How to keep a whole catalog consistent
One good image is easy. A hundred that look like they belong to the same store take a system. Write a short style guide with the background color, the light direction, the camera angle, the amount of empty space and the mood. Save the prompt wording that produced your best images and reuse it for every product, changing only the product name and size.
Batch generation helps once the style is fixed. Run the same prompt across a group of similar products, then review the whole set side by side on one screen. Inconsistent shadows, a different tone of white or a changed angle stand out immediately. Re-shoot or regenerate the odd ones out, and keep one real photo per product as the reference for every future update.
Will AI product photos look generic?
They can, when everyone uses the same default prompts and the same popular backgrounds. Shoppers who see the same marble counter and eucalyptus branch in every store stop noticing it. To stand out:
- Tie the scene to your brand and customer, such as the kitchen, workshop or street where the product is used
- Choose a color palette and keep it across the catalog
- Use props that belong to the product story, not random decor
- Mix AI scenes with some real photos and real customer images
- Vary angles and distances instead of repeating one composition
- Rewrite prompts instead of accepting the tool’s default style
Common mistakes
Most failures in how to create product photos with AI come from the same few habits:
- Starting with a poor photo. Blur, clutter and bad light carry into every result.
- Letting the product change. Altered size, color or label text leads to returns.
- Accepting the first result. A batch of variants gives you something to choose from.
- Writing a prompt that is too long. A few clear phrases work better than a paragraph of adjectives.
- Using an AI image as the Amazon main image without checking the current rules.
- Making every product look the same as everyone else. Set a style for your brand and keep it.
- Skipping tests. Without a comparison, you do not know whether the new images help.
- Forgetting alt text and file names.
Honesty, rights and privacy
The picture must show what the customer will receive. In a Stylitics survey cited by Shopify, 71% of consumers could not reliably tell AI product photos from professional ones, which makes it easy to mislead without meaning to. If the image shows a bigger candle, a brighter color or a feature you do not sell, the return and the bad review are on you.
Read the terms of each tool for commercial use, watermarks and image ownership. Check whether it stores or uses your uploads, especially for unreleased products. Some tools can use uploaded files under their terms, so read them before you upload anything confidential. The guide on AI data privacy for business explains what to look for.
How to create product photos with AI for a small business
AI product photography does not need a big budget or a design team, even for a small shop. Here is a one-hour plan for a single product, using a free tool:
- Minutes 0 to 10: shoot the base photo near a window on a white sheet.
- Minutes 10 to 20: remove the background and check the edges.
- Minutes 20 to 40: generate a studio shot, a lifestyle shot and a detail shot, four variants each.
- Minutes 40 to 50: review the images against the real product and pick the best three.
- Minutes 50 to 60: export in the right sizes and upload them with alt text.
If you are building a wider plan for a small team, the guide on AI for small business shows which tools fit a small budget. Start with your best-selling product, since a good picture helps it most.
AI product photo checklist
Run through this list before you publish any AI product photos:
- The base photo is sharp, well lit and at least 1000 px
- The background was removed and the edges are clean
- The shot type matches the job of the image
- The prompt includes the product size and a “keep unchanged” instruction
- Four or five variants were generated and compared
- Shape, color, proportions and label text match the real product
- Light, shadows and scale look natural
- The size and background fit each channel, including Amazon rules
- File name and alt text are written
- The tool’s terms allow commercial use, and the image shows the product honestly
Conclusion
Learning how to create product photos with AI is mostly about control. Start from a real photo, change only the scene, write prompts that protect the product and check every image against the real item. Use AI product photos for the pictures where variety matters, and keep real photos where accuracy matters most. Take one product this week, run the six steps and compare the result with your current images.
Frequently asked questions
Can AI make product photos?
Yes. AI product photography tools can generate new backgrounds, light and scenes around a photo of your product, and some can place it on a model. The best results come from a clean base photo, a clear prompt and a check against the real item before you publish.
How do I create product photos with AI for free?
Use a phone photo and a free tool. Google Product Studio is free in Merchant Center and the Google and YouTube app on Shopify. Shopify merchants can use Magic in the admin, and many dedicated apps have free plans with limits. Free plans may add watermarks or limit commercial use, so check the terms.
What is the best AI for product photos?
It depends on your job. Shopify Magic suits quick edits in a store, Photoroom suits fast batches, Pebblely suits simple scenes and Google Product Studio is free. Test three tools with the same three products and pick the one with the most usable images.
Do I need a real product photo to start?
For accurate results, yes. A real photo gives the tool the exact shape, color and label. Text-only generation invents the product, which is fine for concepts but risky for a listing, because the image may not match what you ship.
How do I keep my logo and label accurate?
Use a tool that keeps your original product pixels and replaces only the background, add “keep the exact shape, label text and colors” to the prompt, and read every word at full size. If the text is wrong, add the label back in an editor or discard the image.
Does Amazon allow AI-generated product images?
Amazon requires the main image to be a photograph of the actual product on a pure white background, so AI scenes belong in the additional images, where other backgrounds are allowed. Images must show the product accurately. Policies change, so check Seller Central before you upload.
Are AI product photos legal to use in ads?
Generally yes, as long as they are not misleading and the tool’s terms allow commercial use. The image must show the product you actually sell. Advertising platforms can have their own rules about AI content, so check them before you run the campaign.
Do AI product photos convert?
AI product photos can convert, but there is no guarantee. Results depend on accuracy, quality and fit with your brand. Test new images against your current ones, change one thing at a time and compare clicks, add-to-cart rate and returns over the same period.
How many variations should I generate?
Generate four or five variants per shot and keep the best two or three. Generating more than that adds review time without much gain. Change one detail per batch so you can see what makes the difference.
Can AI replace a product photographer?
Not completely. AI product photography is strong for secondary images, lifestyle scenes, seasonal variants and tests. A photographer is still the better choice for main images, reflective or complex products, and any shot where exact accuracy is critical.
How long does it take to create product photos with AI?
Generating an image takes seconds to minutes. A full set for one product, including the base photo, cutout, prompts and review, usually takes about an hour. Later products go faster once you have a reusable prompt and style.
What products does AI struggle with?
Reflective, transparent and very detailed products, such as jewelry, glassware and electronics with small text. Items with hands, wall art or light fixtures are also problematic in some tools. For these, use real photos for the main images and AI only for simple backgrounds.
How much does AI product photography cost?
Free options exist, such as Google Product Studio and the free tiers of several apps. Paid plans start at about $9 for a few dozen images and rise with volume. The real cost includes your review time, so calculate the cost per usable image before you compare tools.
Do I need to know how to write prompts?
No. Many tools offer ready-made scenes, and a simple description works for basic results. Learning the formula in this guide, with product, surface, setting, light and a keep-unchanged line, gives you better and more repeatable images.
Can I generate product photos in bulk?
Yes. Several tools support batch generation, and some offer an API. Fix your style guide first, run the same prompt across similar products and review the whole set side by side before you publish.
Will Google or social platforms penalize AI-generated product images?
Google has said it judges content by quality and helpfulness, not by how it was made, but misleading images can still cause problems. Marketplaces and ad platforms have their own rules, including labels for some AI content, so check the current policy of each channel.